

Inductance in AC circuit#
This tutorial describes simple steps to create an AC electrical circuit with a resistor and inductance winding.
In this tutorial, you learn how to model an AC circuit with an inductance coil. As a result of the calculation, it is necessary to determine the value of current in the circuit and the inductance voltage, to analyze the phase shift between them.
1. Create and set up a project#
First, it is necessary to create a new project and give it a name, for example, Inductance in an AC circuit.
In the next step, it is necessary to (see Fig. 1 below):
Disconnect the
Synchronization with real timeoption so that it is possible to set the simulation time < 1 [s];Set the
Simulation timebysetting a value of 0.2 [s] to the corresponding project parameter;Configure the
Integration stepbysetting a value of 0.05 [ms] to the corresponding project parameter;Adjust the
Sampling stepbysetting a value of 0.05 [ms] to the corresponding project parameter.
Important
In REPEAT VISION decimal numbers are separated by a dot.
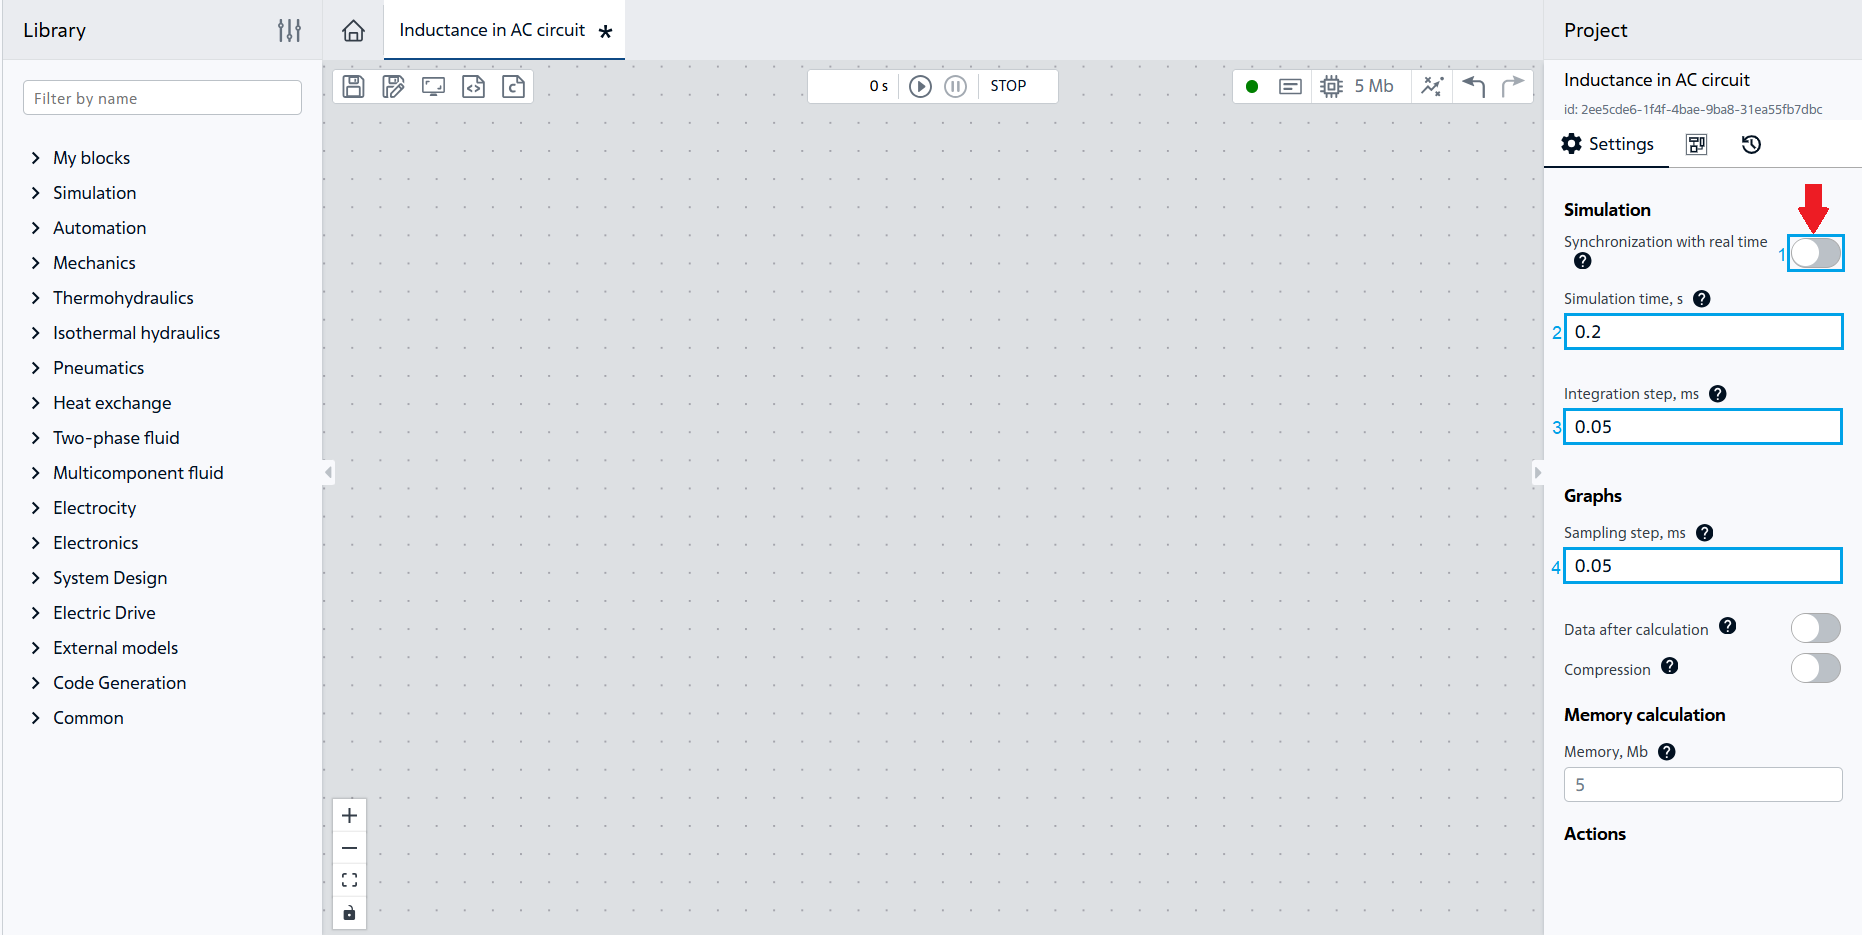
Fig. 1 Set up a project#
Let’s get started with the basic steps of creating a circuit by opening the library Electronics.
2. Creating a voltage source#
Let’s add the first block of our circuit (see Fig. 2 below), for this purpose move the Voltage source block to the working area to power the AC circuit.
The following shall be done in properties of the first block:
Select the
Source type- AC (alternating current);Specify the amplitude value - 38.2 [V];
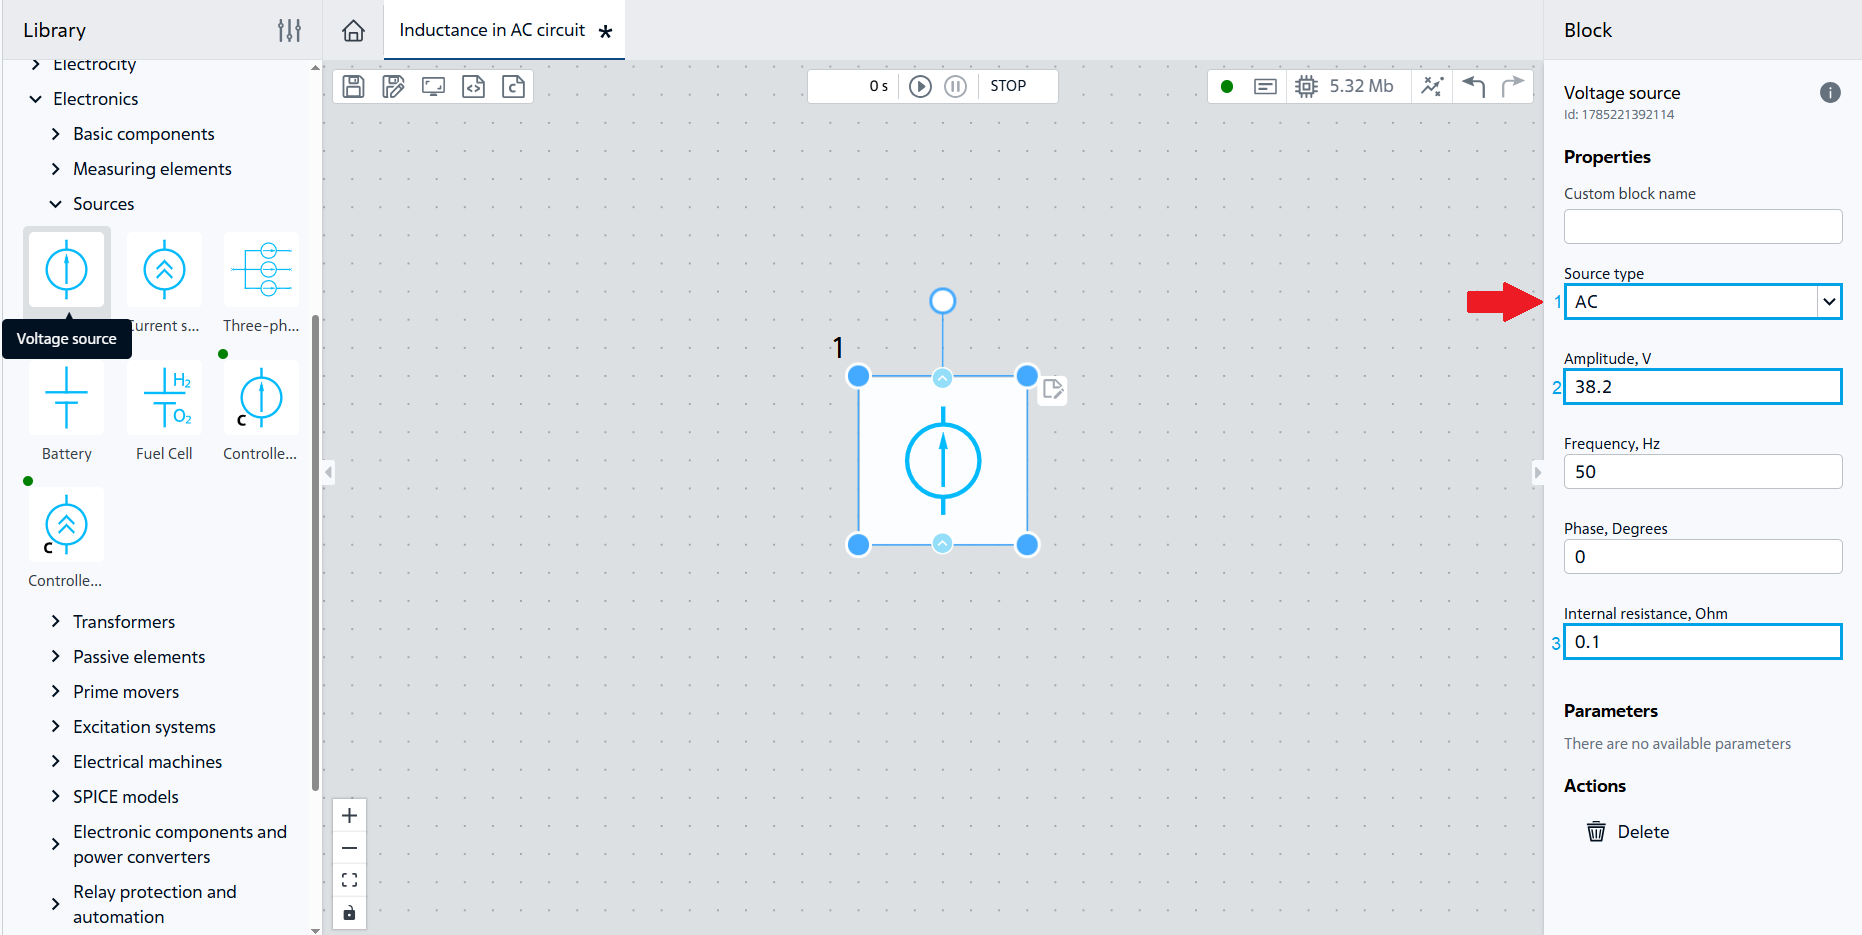
Fig. 2 Adding and configuring the Voltage source block#
As a result, the project is ready to add measuring elements. Save the project and continue with the next steps.
3. Adding measuring components#
To measure the circuit parameters, we add the Current meter and Voltage meter blocks, which must be rotated 90\(^0\) to the right (see note under the figure).
Place and connect the blocks in accordance with the Fig. 3 below:
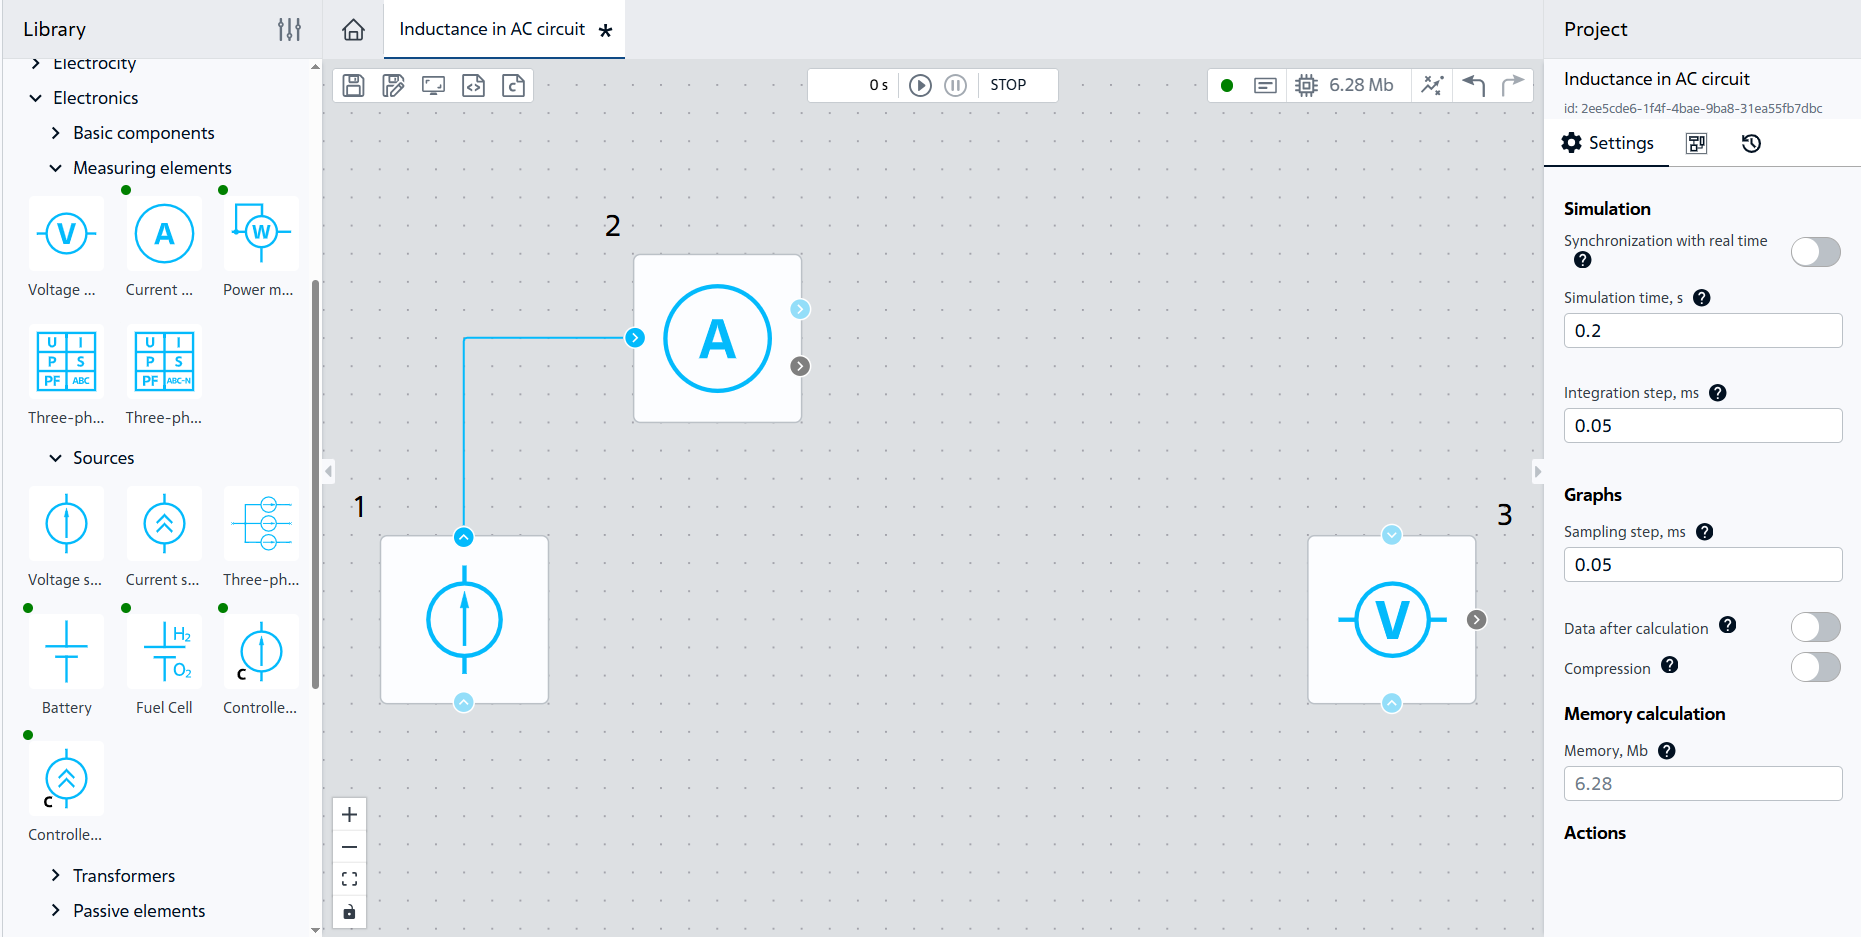
Fig. 3 Adding measuring components#
Important
In order to obtain correct voltmeter readings, the “+” input of the voltmeter and the “+” input of the inductance coil shall be connected to the same node, similarly, the “-” input of the voltmeter and the “-” output of the inductance coil shall also be connected to the same node. Otherwise, the voltmeter signal will be out of phase (inverted) with respect to the coil voltage.
4. Creating a resistor#
Add a Resistor block to set the resistance. Move the block with the same name to the working area, and in its properties set the resistance value - 0.00001 [Ohm].
Then connect blocks as shown in the Fig. 4:
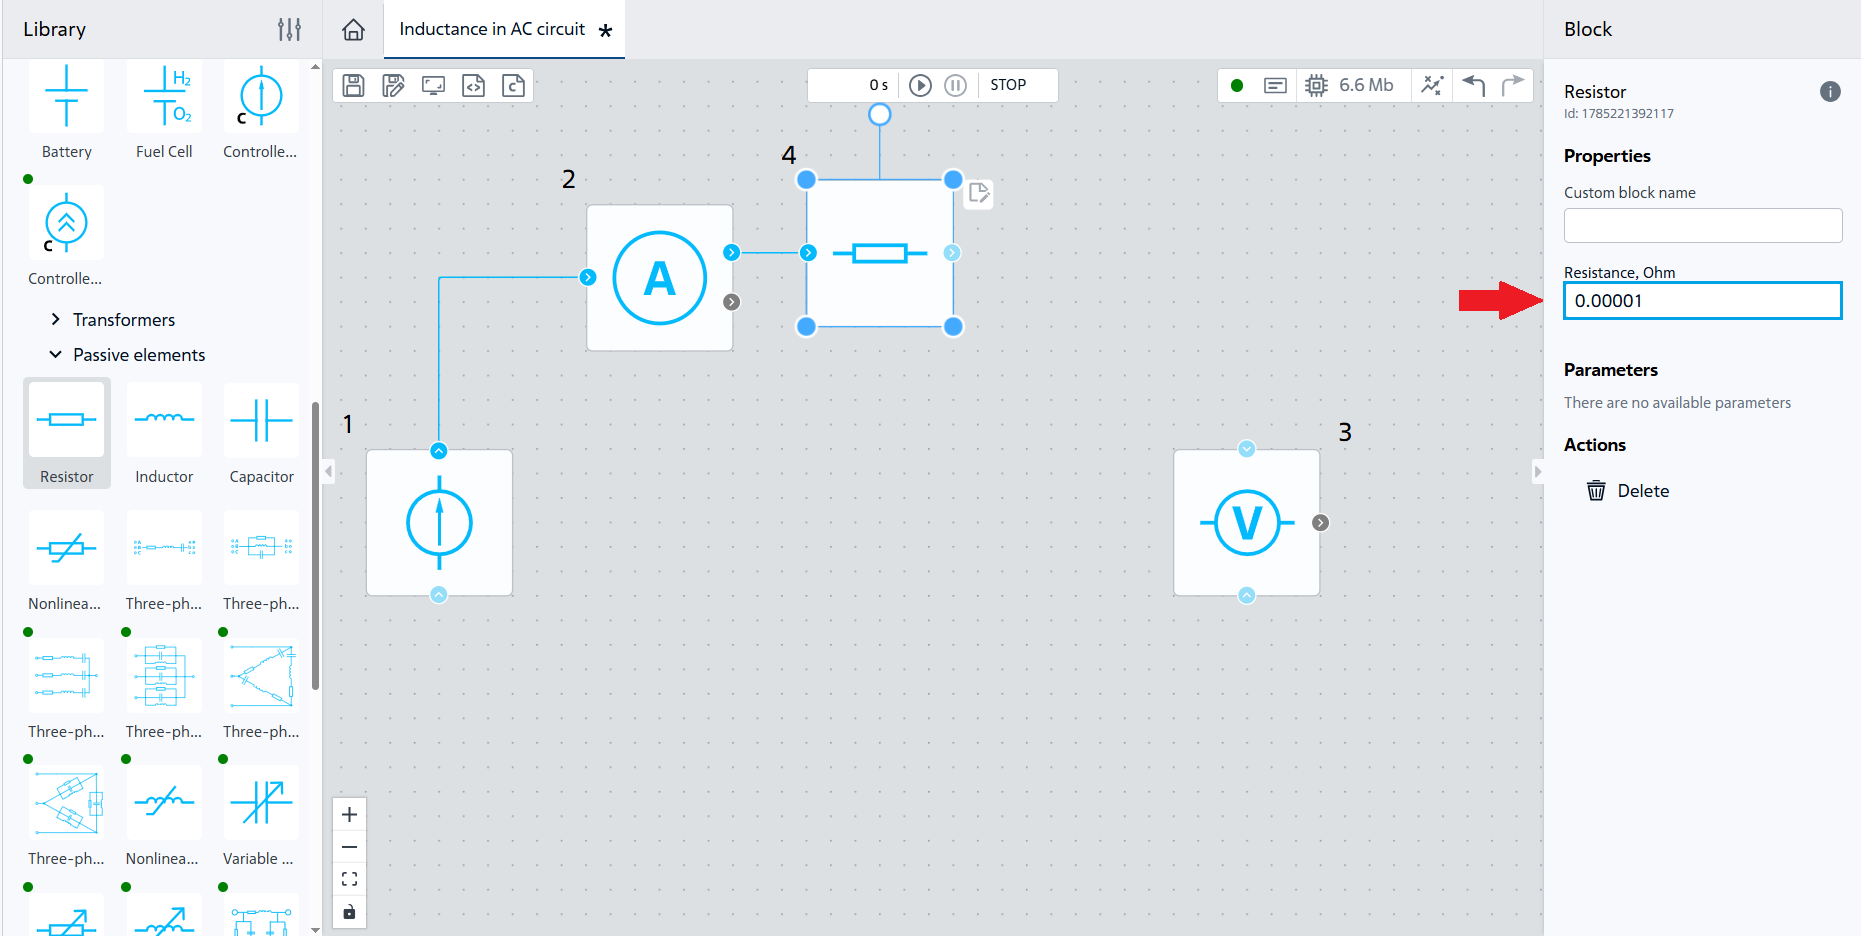
Fig. 4 Adding and configuring the Resistor block#
5. Creating nodes#
In order to connect a voltmeter add the Node block, in order to do this, it is necessary to move the block of the same name to the work area and then you need to set the value of the Number of output ports property to 2.
Then it is necessary to copy the Node block by selecting it (click on the block with the LMB) then CTRL+C, CTRL+V commands and rotate it 180\(^0\) for the convenience of creating a diagram.
Then connect blocks as shown in the Fig. 5:
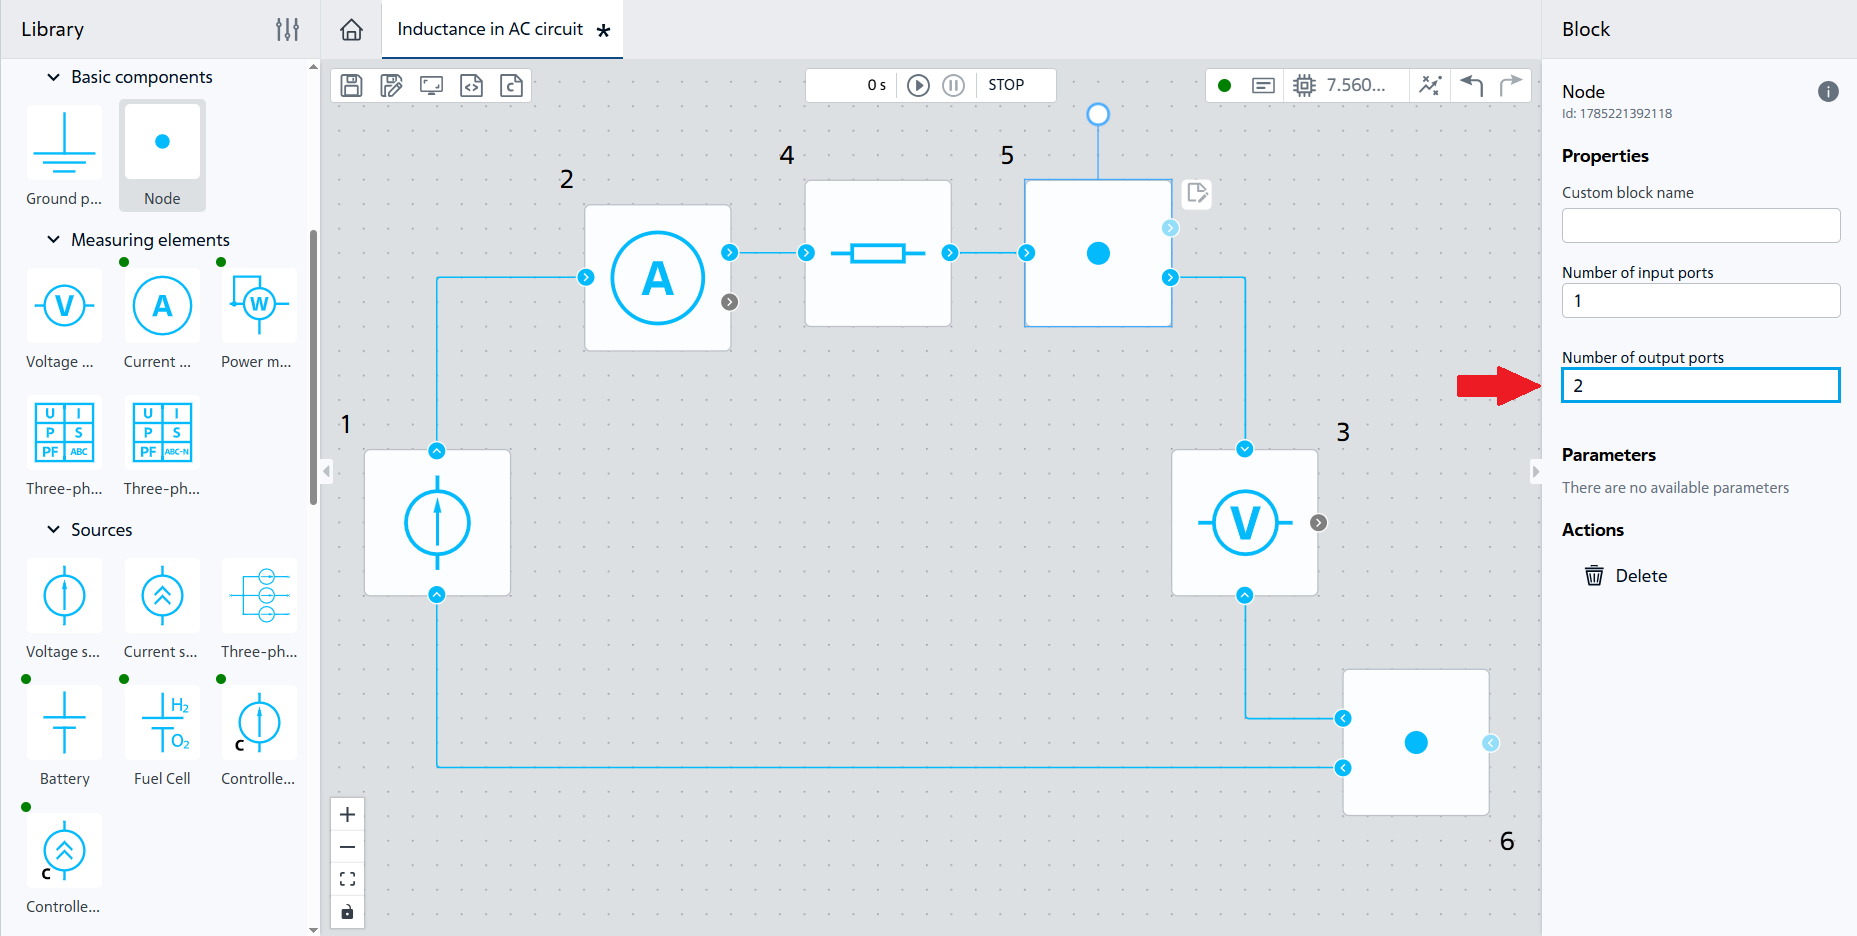
Fig. 5 Adding and configuring Node blocks#
6. Create inductance winding#
In order to accumulate the energy of the magnetic field add the Inductor block, for this purpose it is necessary to move the block of the same name to the working area, rotate it by 90\(^0\) to the right for the convenience of drawing the circuit and then specify the value of the Inductance property – 0.005 [H].
Then connect blocks as shown in the Fig. 6:
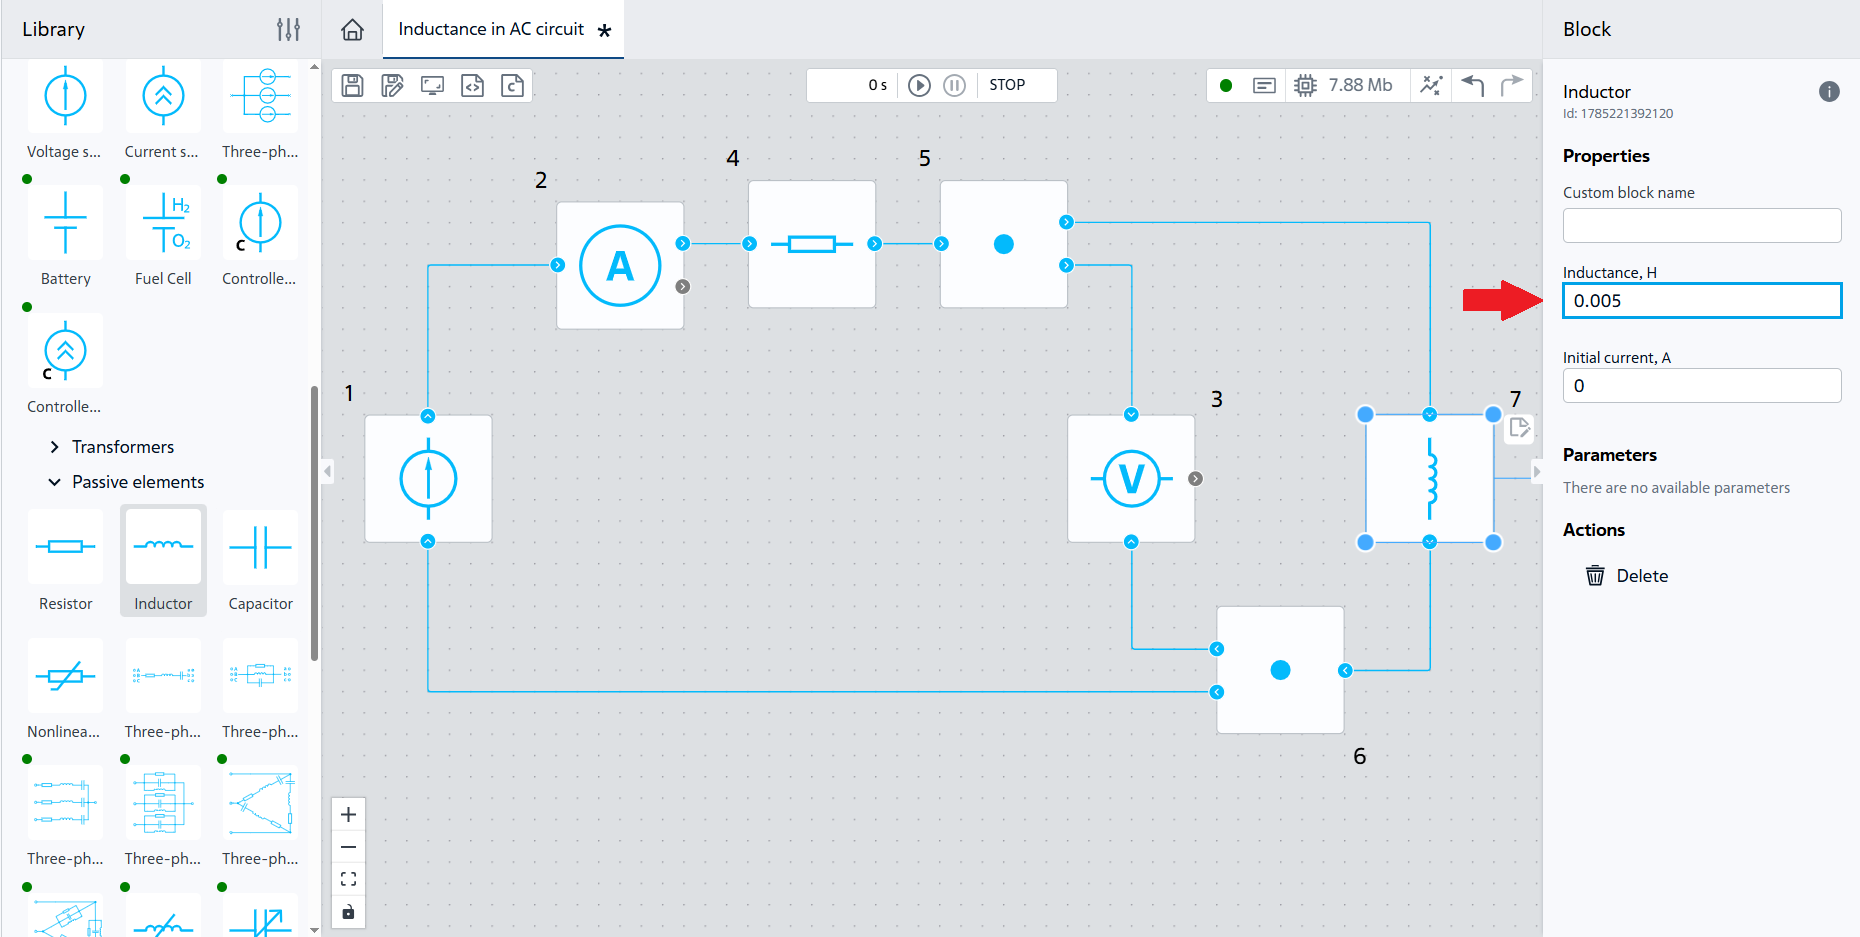
Fig. 6 Connecting and configuring the Inductor block#
7. Add a graph for visualization#
Go to the Visualization tab and add one graph to display the voltage meter and current meter signals, Fig. 7:
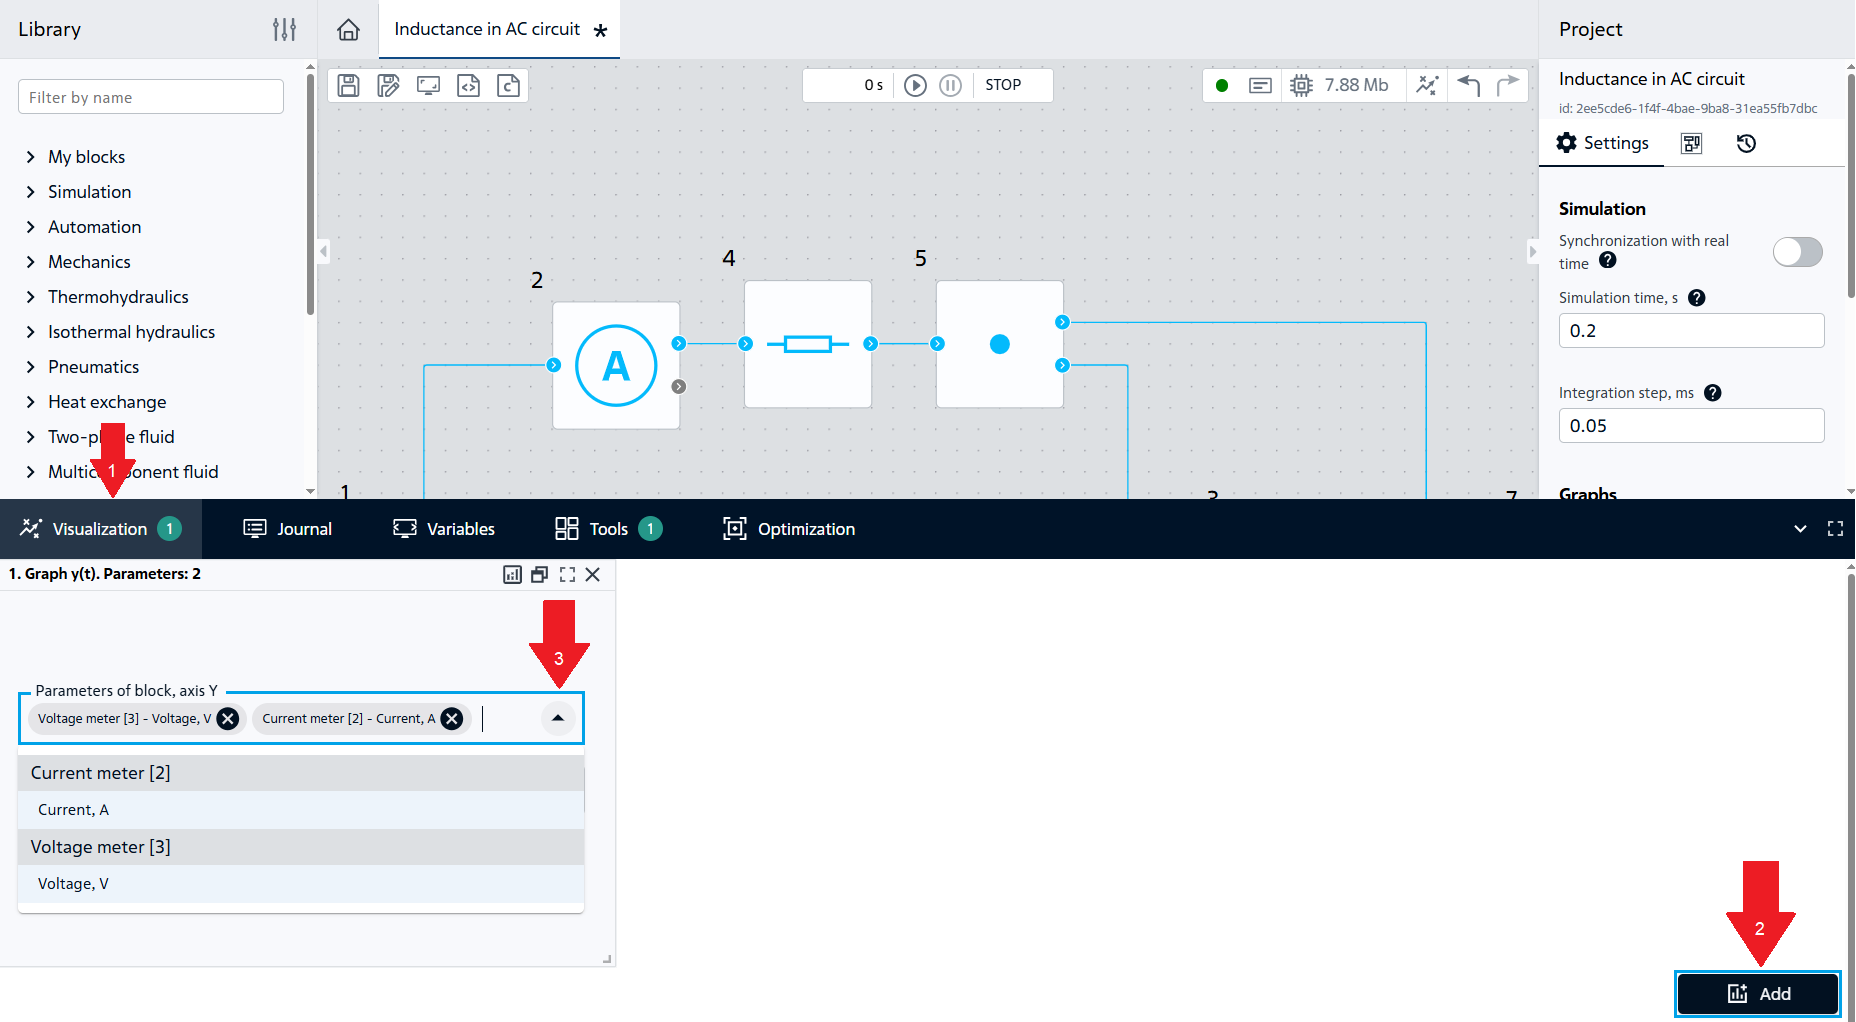
Fig. 7 Adding a graph#
Start the calculation with “Start Simulation” button  and expand the visualization area to full screen

The calculation shall be successfully completed with the following message:
Modeling stopped on the solver side due to modeling time limit exceeded.
In order to expand the graph to the full width of the visualization area (see Fig. 8 below), click the symbol  in the upper right panel in the visualization area where the graph was created. And in order to to expand the visualization area to full screen (see Fig. 9 below), click on symbol , located on the central panel on the right.
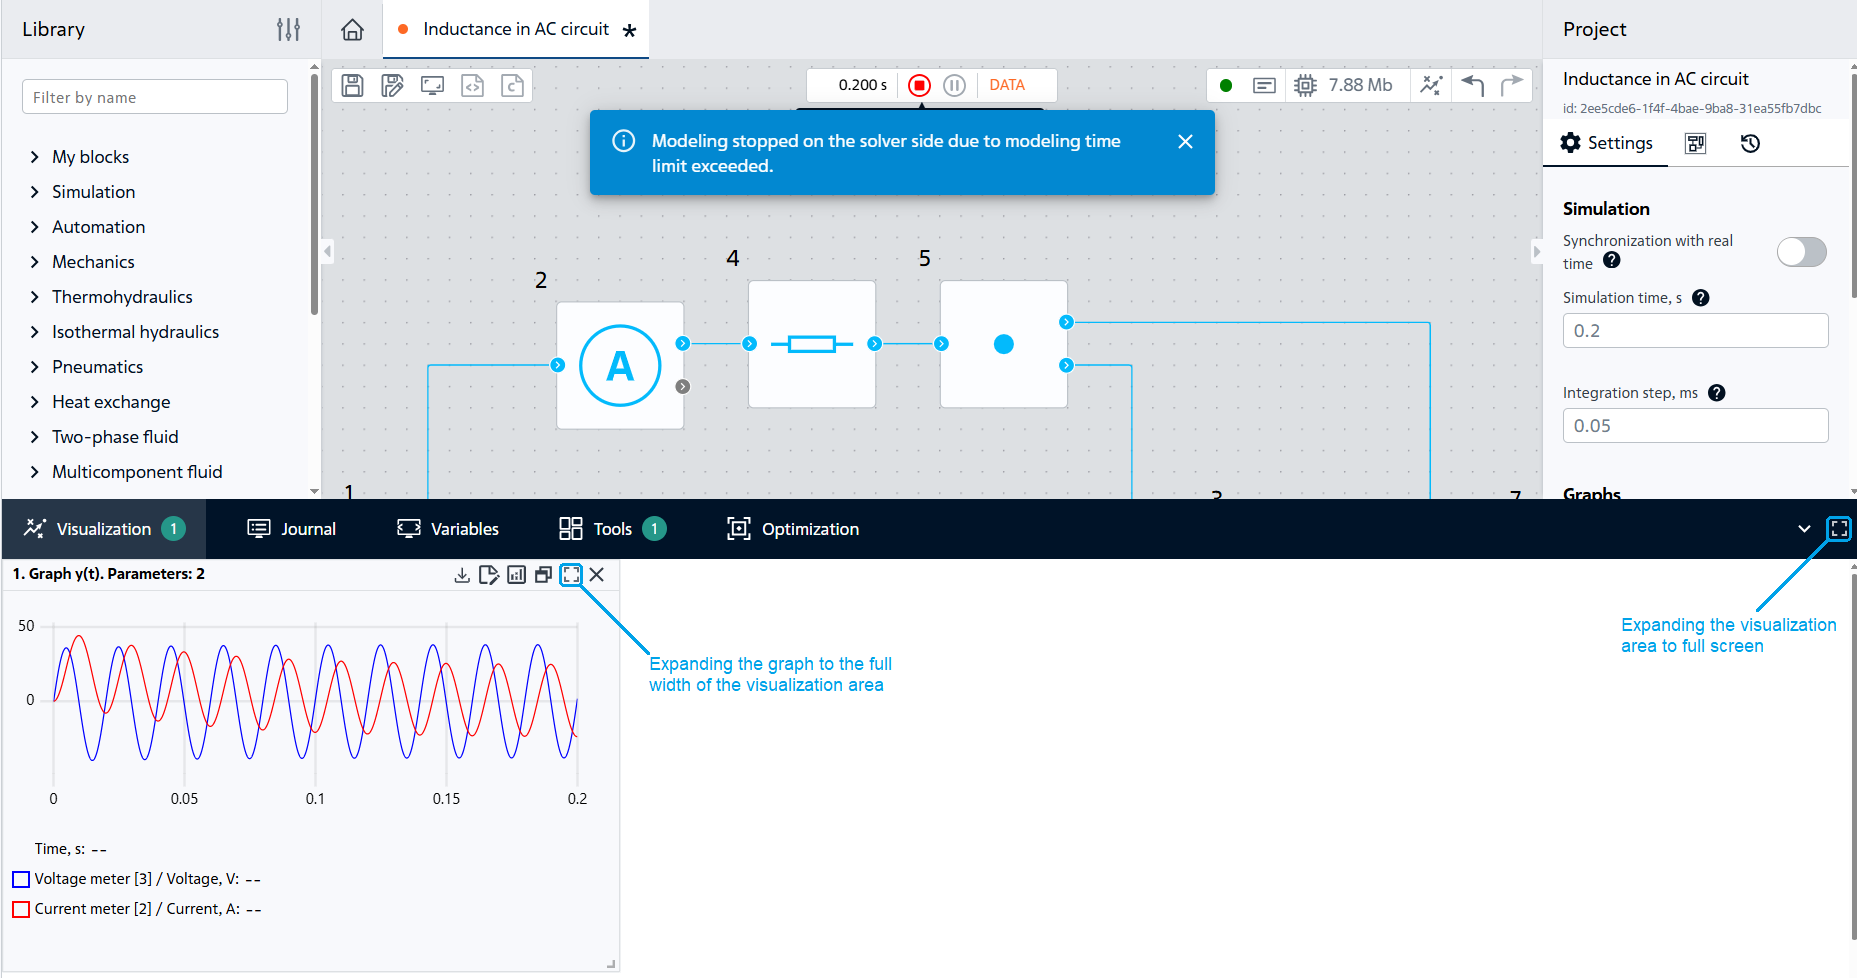
Fig. 8 Displaying the graph across the entire width of the visualization area#
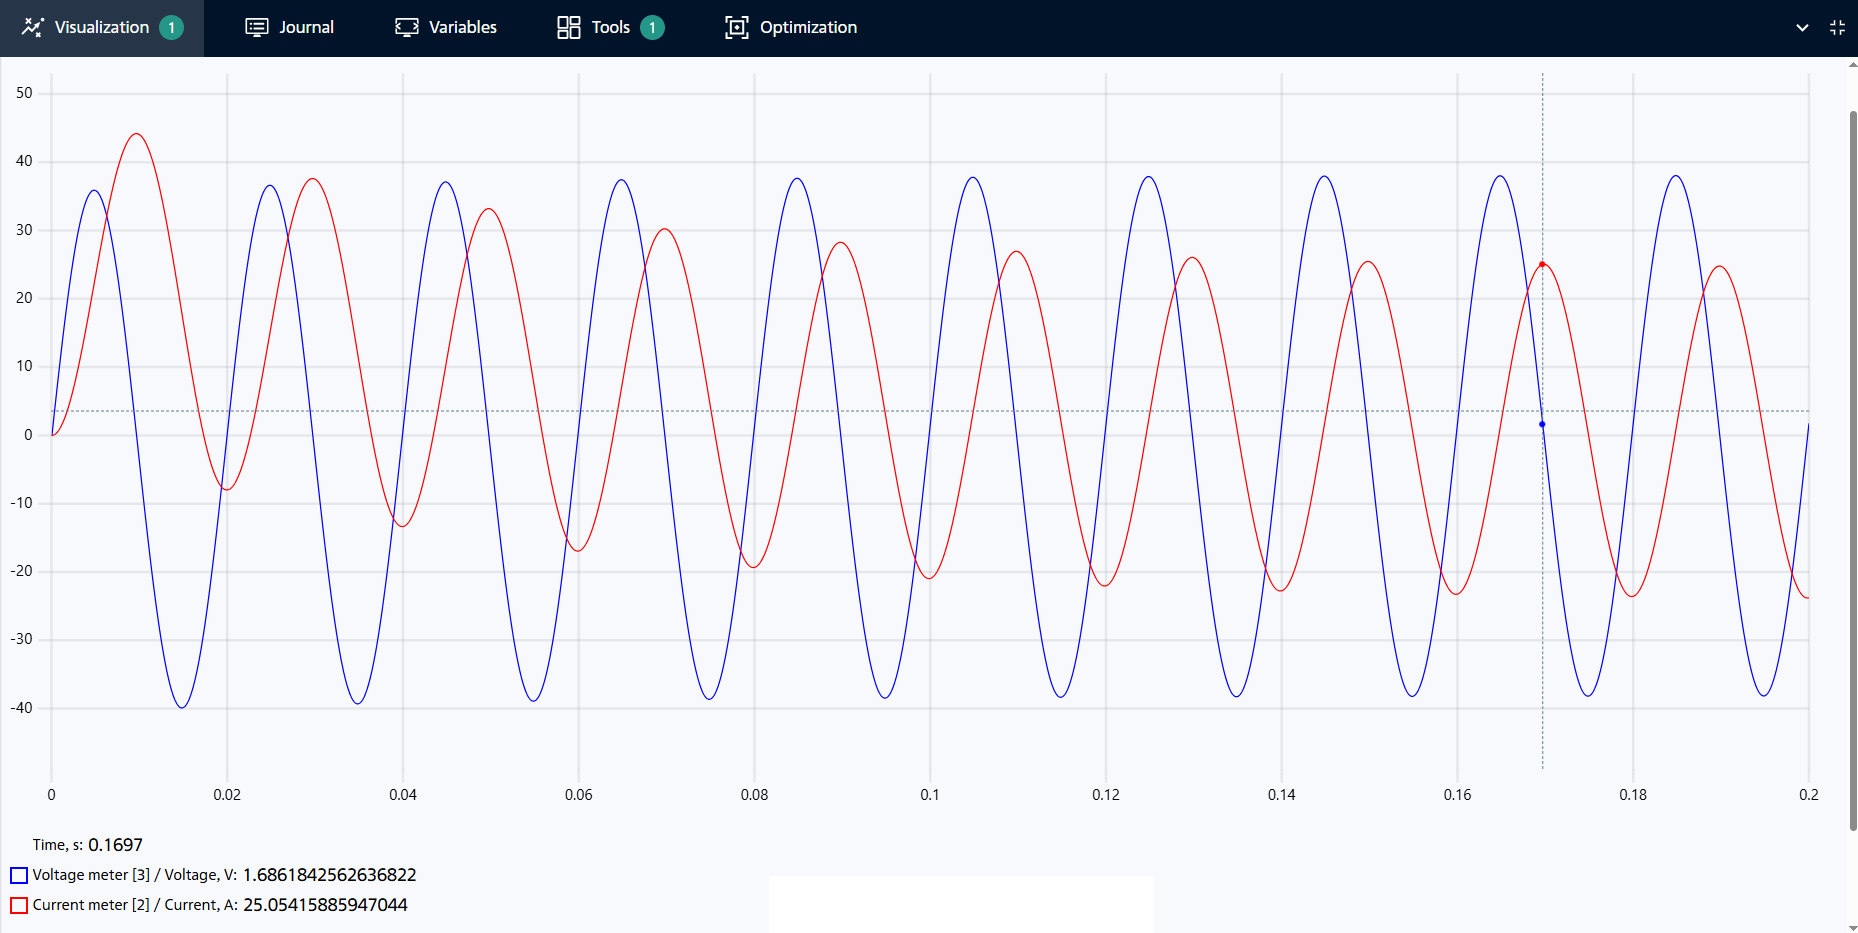
Fig. 9 Displaying the visualization area on the full screen#
Important
Under set coil properties, the first period of the current curve is almost entirely in the positive part of the graph (unipolar). In order to make the current initially bi-polar, it is possible to change the coil properties. In order to do this, a negative value close to the amplitude current shall be set as the initial coil current. In this case, the value was set to -24 [A], Fig. 10:
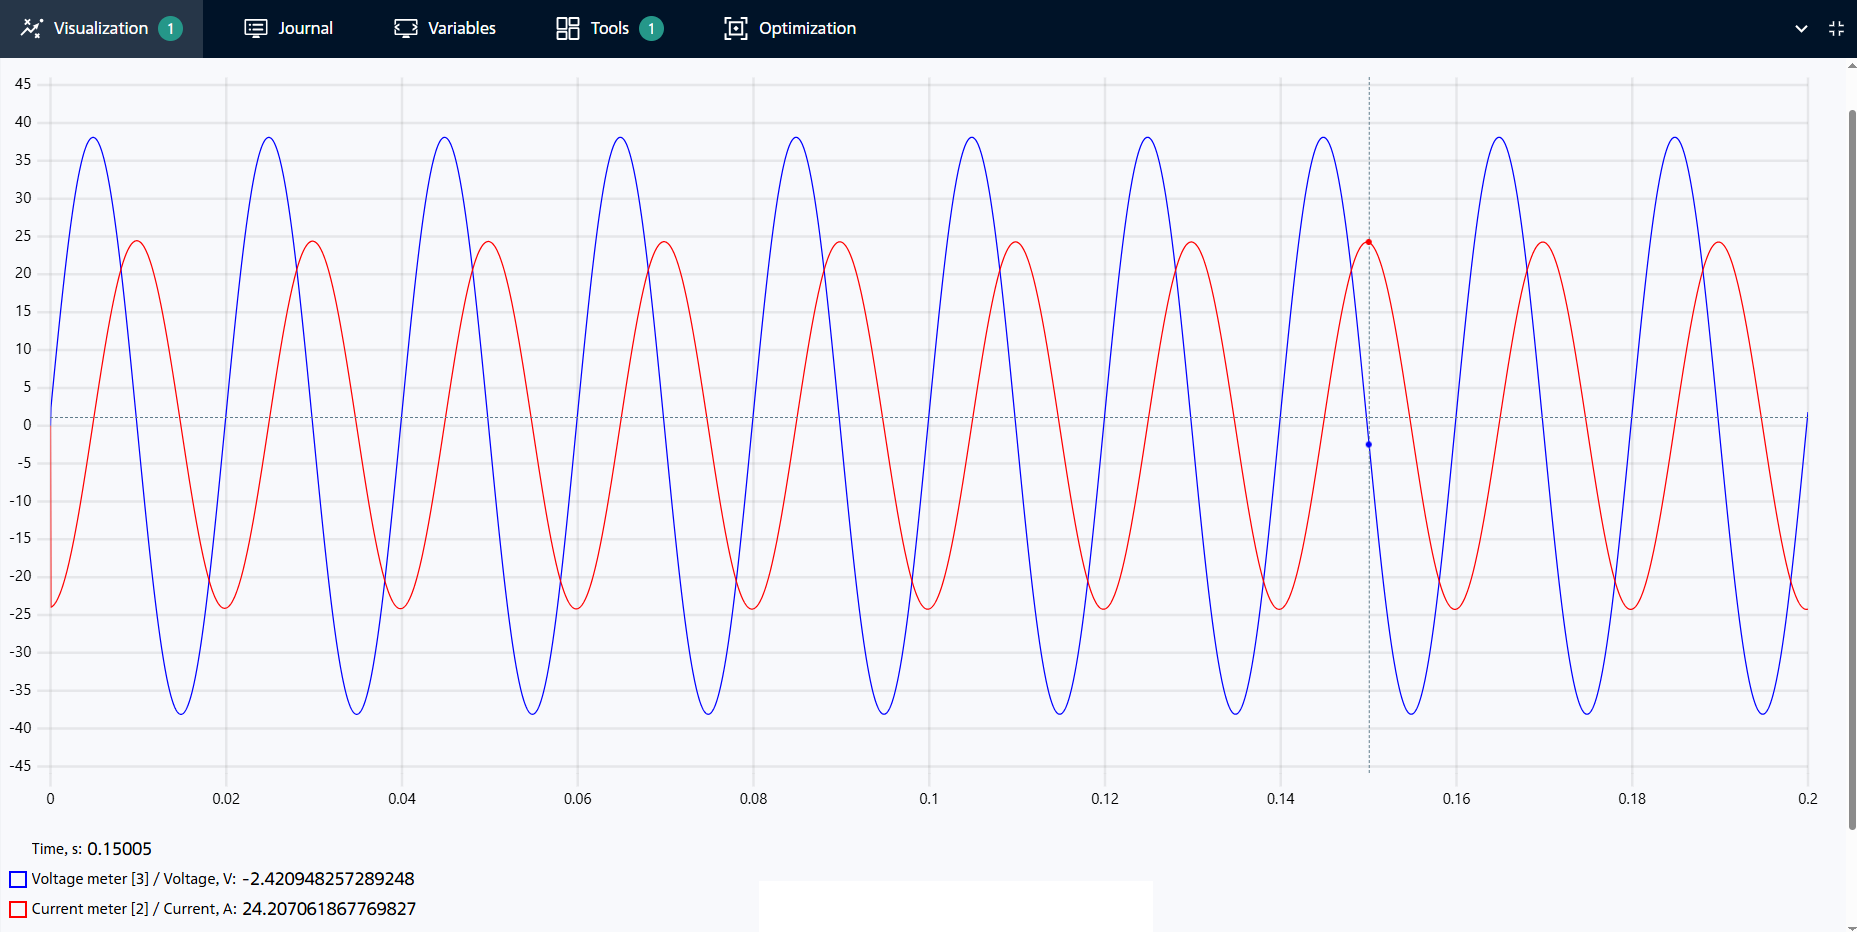
Fig. 10 Graph after changing the coil properties#
8. Analysis of calculation results#
The results of simulation correspond to the theory: in an alternating current circuit, the inductive coil resists the flowing current - it has inductive resistance. At the initial time, the current signal changes gradually due to the presence of self-induction EMF in the winding, which prevents the current through it from changing. Also, the current on the inductance coil delays from the voltage on it by 90\(^0\) (by ¼ periods or by 0.005 [s]). The amplitude value of the current in the circuit is approximately 24.8 [A], the voltage on the inductance coil is 38 [V]. Setting the initial value of the current in properties of the inductance coil in this case allows to reduce the transient time when the circuit is activated.
9. Conclusions#
In this tutorial, you learned the basics of creating the AC electrical circuit with a resistor and inductance coil. You have learned:
Set parameters of the Voltage source block for an AC circuit.
Set parameters of the Inductor block for an AC circuit.